-
Light, Shadows and Reflections
We see so many objects around us. On the way to school we see things like buses,cars,cycles, trees, animals and sometimes flowers. How do you think, we see objects?Think of the same places at night time if it were completely dark. What will you see? Suppose you go inside a completely dark room. Are you able to see any objects in the room?But, when you light a candle or a torch you can see the objects present in the room, isn’t it? Without light, things cannot be seen. Light helps us see objects.The torch bulb is an object that gives out light of its own. The Sun, is another familiar object that gives its own light. During the day, its light allows us to see objects. Objects like the sun that give out or emit light of their own are called luminous objects.What about objects like a chair, a painting or a shoe? We see these when light from a luminous object (like the Sun, a torch or an electric light) falls on these and then travels towards our eye.
TRANSLUCENT OPAQUE AND OBJECTS
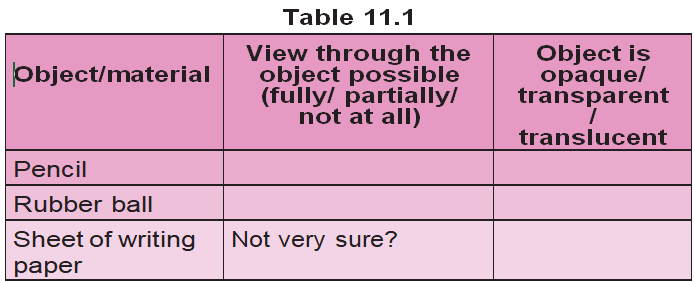
Recall our grouping objects as opaque, transparent or translucent, in Chapter 4. If we cannot see through an object at all, it is an opaque object. If you are able to see clearly through an object, it is allowing light to pass through it and is transparent. There are some objects through which we can see, but not very clearly. Such objects are known as translucent.
Activity 1
Look around yourself and collect as many objects as you can — an eraser, plastic scale, pen, pencil, notebook, single sheet of paper, tracing paper or a piece of cloth. Try to look at something far away, through each of these objects (Fig. 11.1). Is light from a far away object able to travel to your eye, through any of the objects?
Record your observations in a table as shown in Table 11.1.
We see that a given object or material could be transparent, translucent or opaque depending on whether it allows light to pass through it completely, partially or not at all.
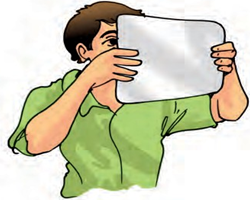
Fig. 11.1 Observing objects that do or do not allow light to pass through them
WHAT EXACTLY ARE SHADOWS?
Activity 2
Now, one by one hold each of the opaque
objects in the sunlight, slightly above the ground. What do you see on the ground? You know that the dark patch formed by each on the ground is due to its shadow. Sometimes you can identify the object by looking at its shadow (Fig. 11.2).
Spread a sheet of paper on the ground. Hold a familiar opaque object at some height, so that its shadow is formed on the sheet of paper on the ground. Ask one of your friends to draw

Fig. 11.2 Sometimes shadow of an object gives an idea about its shape
the outline of the shadow while you are holding the object. Draw outlines of the shadows of other objects in a similar way.
Now, ask some other friends to identify the objects from these outlines of shadows. How many objects are they able to identify correctly?
Do you observe your shadow in a dark room or at night when there is no light? Do you observe a shadow when there is just a source of light and nothing else, in a room? It seems we need a source of light and an opaque object, to see a shadow. Is there anything else required?
Activity 3
This is an activity that you will have to do in the dark. In the evening, go out in an open ground with a few friends. Take a torch and a large sheet of cardboard with you. Hold the torch close to the ground and shine it upwards so that its light falls on your friend's face. You now have a source of light that is falling on an opaque object. If there were no trees, building or any other object behind your friend, would you see the shadow of your friend's head? This does not mean that there is no shadow. After all, the light from the torch is not able to pass through his body to the other side.
Now, ask another friend to hold the cardboard sheet behind your friend. Is the shadow now seen on the cardboard sheet (Fig. 11.3)?
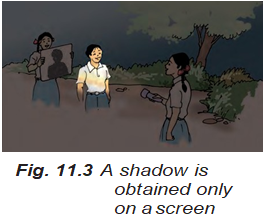
Thus, the shadow can be seen only on a screen. The ground, walls of a room a building, or other such surfaces act as a screen for the shadows you observe in everyday life.
Shadows give us some information about shapes of objects. Sometimes, shadows can also mislead us about the shape of the object. In Fig. 11.4
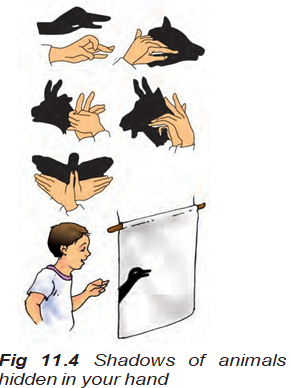
are a few shadows that we can create with our hands and make-believe that they are shadows of different animals. Have fun!
Activity 4
Place a chair in the school ground on a sunny day. What do you observe from the shadow of the chair?
Does the shadow give an accurate picture of the shape of the chair? If the chair is turned around a little, how does the shape of the shadow change?
Take a thin notebook and look at its shadow. Then, take a rectangular box and look at its shadow. Do the two shadows seem to have a similar shape? Take flowers or other objects of different colours and look at their shadows. A red rose and
a yellow rose, for instance.Do the shadows look different in colour, when the colours of the objects are different?
Take a long box and look at its shadow on the ground. When you move the box around, you may see that the size of the shadow changes. When is the shadow of the box the shortest, when the long side of the box is pointed towards the Sun or when the short side is pointing towards the Sun?Let us use this long box, to prepare a simple camera.
PINHOLE CAMERA
You might think that we need a lot of stuff to make a camera? Not really. If we just wish to make a simple pin hole camera.
Activity 5
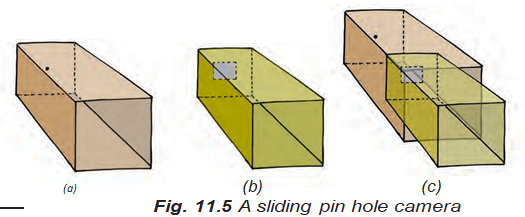
Take two boxes of cardboard such that one can slide into another with no gap in between them. Cut open one side of each box. On the opposite face of the larger box, make a small hole in the middle [Fig. 11.5 (a)]. In the smaller box, cut out from the middle a square with a side of about 5 to 6 cm. Cover this open square in the box with tracing paper (translucent screen) [Fig. 11.5 (b)]. Slide the smaller box inside the larger one with the hole, in such a way that the side with the tracing paper is inside [Fig. 11.5 (c)]. Your pinhole camera is ready for use.
Holding the pinhole camera look through the open face of the smaller box. You should use a piece of black cloth to cover your head and the pinhole camera. Now, try to look at some distant objects like a tree or a building through the pinhole camera. Make sure that the objects you wish to look at through your pinhole camera are in bright sun shine. Move the smaller box forward or backward till you get a picture on the tracing paper pasted at the other end.
Are these pinhole images different from their shadows?
Look through your pinhole camera at the vehicles and people moving on the road in bright sunlight.
Do the pictures seen in the camera show the colours of the objects on the other side? Are the images erect or upside down? Surprise, surprise!
Let us now image the Sun, with our pinhole camera. We need a slightly different set up for this. We just need a large sheet of cardboard with a small pinhole in the middle. Hold the sheet up in the Sun and let its shadow fall on a clear area. Do you see a small circular image of the Sun in the middle of the shadow of the cardboard sheet?
Look at these pinhole images of the Sun when an eclipse is visible from your location. Adjust your pinhole and screen to get a clear image before the eclipse is to occur. Look at the image as the eclipse begins. You will notice a part
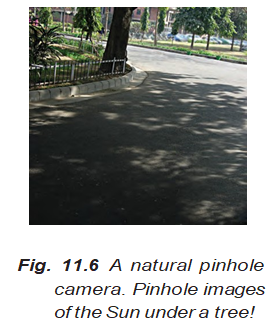
of the image of the Sun gradually becoming darker as the eclipse starts. Never ever look directly at the Sun. That could be extremely harmful for the eyes.There is an interesting pinhole camera in nature. Sometimes, when we pass under a tree covered with large number of leaves, we notice small patches of sunlight under it (Fig. 11.6). These circular images are, in fact, pinhole images of the Sun. The gaps between the leaves, act as the pinholes. These gaps are all kinds of irregular shapes, but, we can see circular images of the Sun.
Sun when an eclipse occurs next. That could be so much fun!
Boojho has this thought. We saw upside down images of people on the road, with our pinhole camera. What about the images of the Sun? Did we notice them to be upside down or anything like that?
Paheli has another thought. Surely, all these results that we are seeing, formation of shadows and pinhole images are possible only if light moves in a straight path?
Activity 6
Let us use a piece of a pipe or a long rubber tube. Light a candle and fix it on a table at one end of the room. Now standing at the other end of the room look at the candle through the pipe
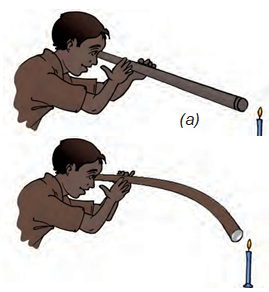
Fig. 11.7 Looking through a pipe pointed
(a) towards and (b) a little away from a candle
[Fig. 11.7 (a)]. Is the candle visible? Bend the pipe a little while you are looking at the candle [Fig. 11.7 (b)]. Is the candle visible now? Turn the pipe a little to your right or left. Can you see the candle now?
What do you conclude from this?
This suggests that light travels along a straight line, isn’t it? That is why, when opaque objects obstruct it, a shadow forms.
MIRRORS AND REFLECTIONS
We all use mirrors at home. You look into the mirror and see your own face inside the mirror. What you see is a reflection of your face in the mirror. We also see reflections of other objects that are in front of the mirror. Sometimes, we see reflections of trees, buildings and other objects in the water of a pond or a lake.
Activity 7
This activity should be done at night or in a dark room. Ask one of your friends to hold a mirror in his/her hand at one corner of the room. Stand at another corner with a torch in your hand. Cover the glass of torch with your fingers and switch it on. Adjust your fingers with a small gap between them so that you can get a beam of light. Direct the beam of the torch light onto the mirror that your friend is holding. Do you see a patch of light on the other side (Fig. 11.8)? Now,
adjust the direction of the torch so that the patch of light falls on another friend standing in the room.
This activity suggests that a mirror changes the direction of light that falls on it.
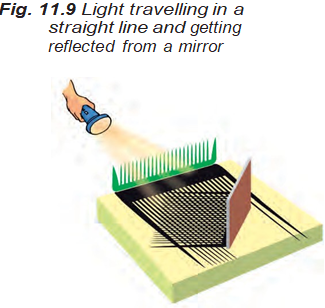
Here is an activity that shows light travelling along straight lines and getting reflected from a mirror.
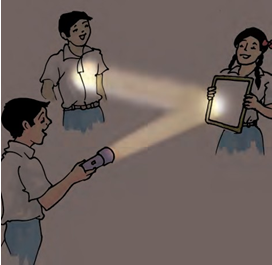
Fig. 11.8 A mirror reflects a beam of light
Activity 8
Fix a comb on one side of a large thermo Col sheet and fix a mirror on the other side as shown in Fig. 11.9. Spread a dark coloured sheet of paper between the mirror and the comb. Keep this in sunlight or send a beam of light from a torch through the comb.
What do you observe? Do you get a pattern similar to that shown in Fig. 11.9?
This activity gives us an idea of the manner in which light travels and gets reflected from a mirror.