-
Visualising Solid Shapes
INTRODUCTION: PLANE FIGURES AND SOLID SHAPES
In this chapter, you will classify figures you have seen in terms of what is known as dimension.
In our day to day life, we see several objects like books, balls, ice-cream cones etc., around us which have different shapes. One thing common about most of these objects is that they all have some length, breadth and height or depth. That is, they all occupy space and have three dimensions. Hence, they are called three dimensional shapes.
Do you remember some of the three dimensional shapes (i.e., solid shapes) we have seen in earlier classes?
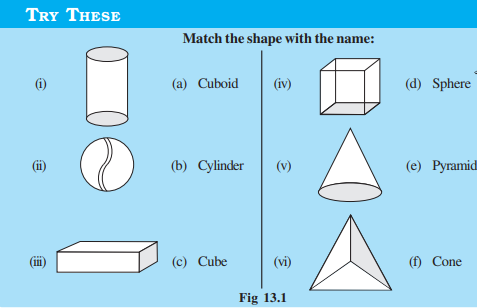
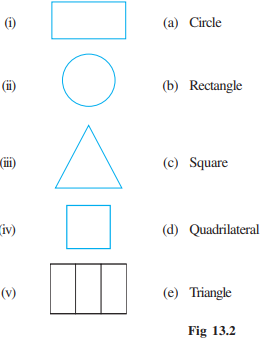
Try to identify some objects shaped like each of these. By a similar argument, we can say figures drawn on paper which have only length and breadth are called two dimensional (i.e., plane) figures. We have also seen some two dimensional figures in the earlier classes. Match the 2 dimensional figures with the names (Fig 13.2)
Note: We can write 2-D in short for 2-dimension and 3-D in short for 3-dimension.
-
Visualising Solid Shapes
FACES, EDGES AND VERTICES
Do you remember the Faces, Vertices and Edges of solid shapes, which you studied earlier? Here you see them for a cube:

The 8 corners of the cube are its vertices. The 12 line segments that form the skeleton of the cube are its edges. The 6 flat square surfaces that are the skin of the cube are its faces.
Can you see that, the two dimensional figures can be identified as the faces of the three dimensional shapes? For example a cylinder
 has two faces which are circles, and a pyramid, shaped like this
  has triangles as its faces. We will now try to see how some of these 3-D shapes can be visualised on a 2-D surface, that is, on paper. In order to do this, we would like to get familiar with three dimensional objects closely. Let us try forming these objects by making what are called nets.
 -
Visualising Solid Shapes
NETS FOR BUILDING 3-D SHAPES
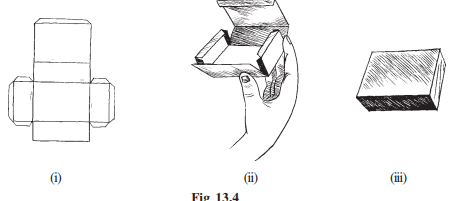
Take a cardboard box. Cut the edges to lay the box flat. You have now a net for that box. A net is a sort of skeleton-outline in 2-D [Fig13.4 (i)], which, when folded [Fig13.4 (ii)], results in a 3-D shape [Fig13.4 (iii)].
Here you got a net by suitably separating the edges. Is the reverse process possible?
Here is a net pattern for a box (Fig 13.5). Copy an enlarged version of the net and try to make the box by suitably folding and gluing together. (You may use suitable units).
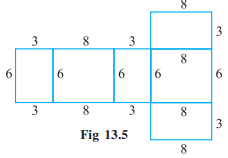
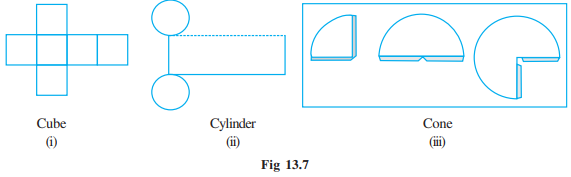
The box is a solid. It is a 3-D object with the shape of a cuboid. Similarly, you can get a net for a cone by cutting a slit along its slant surface (Fig 13.6).

You have different nets for different shapes. Copy enlarged versions of the nets given (Fig 13.7) and try to make the 3-D shapes indicated. (You may also like to prepare skeleton models using strips of cardboard fastened with paper clips).
We could also try to make a net for making a pyramid like the Great Pyramid in Giza (Egypt) (Fig 13.8). That pyramid has a square base and triangles on the four sides.

-
Visualising Solid Shapes
DRAWING SOLIDS ON A FLAT SURFACE
Your drawing surface is paper, which is flat. When you draw a solid shape, the images are somewhat distorted to make them appear three-dimensional. It is a visual illusion. You will find here two techniques to help you.
Oblique Sketches
Here is a picture of a cube (Fig 13.11). It gives a clear idea of how the cube looks like, when seen from the front. You do not see certain faces.

In the drawn picture, the lengths are not equal, as they should be in a cube. Still, you are able to recognise it as a cube. Such a sketch of a solid is called an oblique sketch. How can you draw such sketches? Let us attempt to learn the technique. You need a squared (lines or dots) paper. Initially practising to draw on these sheets will later make it easy to sketch them on a plain sheet (without the aid of squared lines or dots!) Let us attempt to draw an oblique sketch of a 3 × 3 × 3 (each edge is 3 units) cube (Fig 13.12).
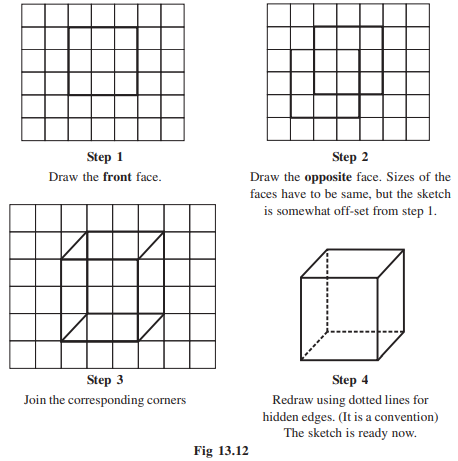
In the oblique sketch above, did you note the following? (i) The sizes of the front faces and its opposite are same; and (ii) The edges, which are all equal in a cube, appear so in the sketch, though the actual measures of edges are not taken so. You could now try to make an oblique sketch of a cuboid (remember the faces in this case are rectangles)
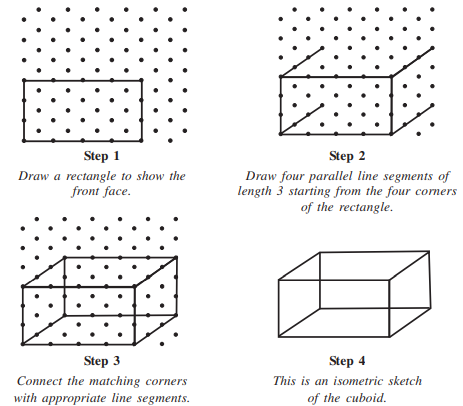
Note: You can draw sketches in which measurements also agree with those of a given solid. To do this we need what is known as an isometric sheet. Let us try to make a cuboid with dimensions 4 cm length, 3 cm breadth and 3 cm height on given isometric sheet
-
Visualising Solid Shapes
Isometric Sketches
Have you seen an isometric dot sheet? (A sample is given at the end of the book). Such a sheet divides the paper into small equilateral triangles made up of dots or lines. To draw sketches in which measurements also agree with those of the solid, we can use isometric dot sheets. [Given on inside of the back cover (3rd cover page).] Let us attempt to draw an isometric sketch of a cuboid of dimension 4 × 3 × 3 (which means the edges forming length, breadth and height are 4, 3, 3 units respectively) (Fig 13.13).
Note that the measurements are of exact size in an isometric sketch; this is not so in the case of an oblique sketch.
EXAMPLE :Here is an oblique sketch of a cuboid [Fig 13.14(i)]. Draw an isometric sketch that matches this drawing.
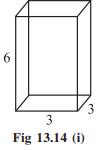
SOLUTION Here is the solution [Fig 13.14(ii)].

Note how the measurements are taken care of. How many units have you taken along (i) ‘length’? (ii) ‘breadth’? (iii) ‘height’? Do they match with the units mentioned in the oblique sketch?
-
Visualising Solid Shapes
Visualising Solid Objects
Here are some activities you could try in your free time to help you visualise some solid objects and how they look. Take some cubes and arrange them as shown in Fig 13.16.
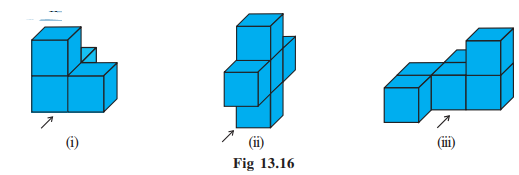
Now ask your friend to guess how many cubes there are when observed from the view shown by the arrow mark.
Such visualisation is very helpful. Suppose you form a cuboid by joining such cubes. You will be able to guess what the length, breadth and height of the cuboid would be.
EXAMPLE : If two cubes of dimensions 2 cm by 2cm by 2cm are placed side by side, what would the dimensions of the resulting cuboid be?
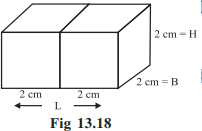
SOLUTION :As you can see (Fig 13.18) when kept side by side, the length is the only measurement which increases, it be comes 2 + 2 = 4 cm.
The breadth =2 cm and the height = 2 cm
-
Visualising Solid Shapes
One Way to View an Object is by Cutting or Slicing
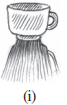
Slicing game Here is a loaf of bread (Fig 13.20). It is like a cuboid with a square face. You ‘slice’ it with a knife.
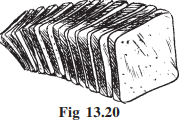
When you give a ‘vertical’ cut, you get several pieces, as shown in the Figure 13.20. Each face of the piece is a square! We call this face a ‘cross-section’ of the whole bread. The cross section is nearly a square in this case.
Beware! If your cut is not ‘vertical’ you may get a different cross section! Think about it. The boundary of the cross-section you obtain is a plane curve. Do you notice it?
A kitchen play
Have you noticed cross-sections of some vegetables when they are cut for the purposes of cooking in the kitchen? Observe the various slices and get aware of the shapes that result as cross-sections.
Play this
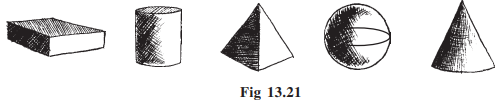
Make clay (or plasticine) models of the following solids and make vertical or horizontal cuts. Draw rough sketches of the cross-sections you obtain. Name them wherever you can.
-
Visualising Solid Shapes
Another Way is by Shadow Play
A shadow play
Shadows are a good way to illustrate how three-dimensional objects can be viewed in two dimensions. Have you seen a shadow play? It is a form of entertainment using solid articulated figures in front of an illuminated back-drop to create the illusion of moving images. It makes some indirect use of ideas in Mathematics.
You will need a source of light and a few solid shapes for this activity. (If you have an overhead projector, place the solid under the lamp and do these investigations.)
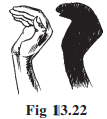
Keep a torchlight, right in front of a Cone. What type of shadow does it cast on the screen? (Fig 13.23) The solid is three-dimensional; what is the dimension of the shadow?

If, instead of a cone, you place a cube in the above game, what type of shadow will you get?
Experiment with different positions of the source of light and with different positions of the solid object. Study their effects on the shapes and sizes of the shadows you get.
Here is another funny experiment that you might have tried already: Place a circular plate in the open when the Sun at the noon time is just right above it as shown in Fig 13.24 (i). What is the shadow that you obtain?

Study the shadows in relation to the position of the Sun and the time of observation
-
Visualising Solid Shapes
A Third Way is by Looking at it from Certain Angles to Get Different Views
One can look at an object standing in front of it or by the side of it or from above. Each time one will get a different view (Fig 13.25).
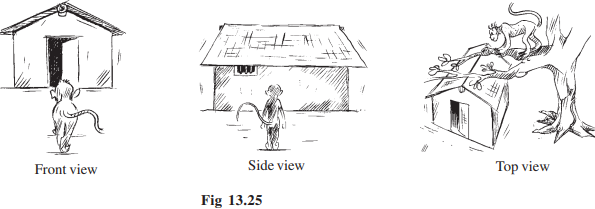
Here is an example of how one gets different views of a given building. (Fig 13.26)
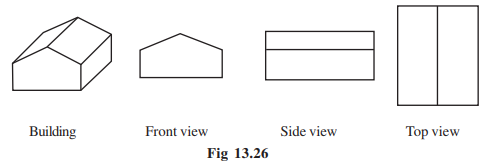
You could do this for figures made by joining cubes.
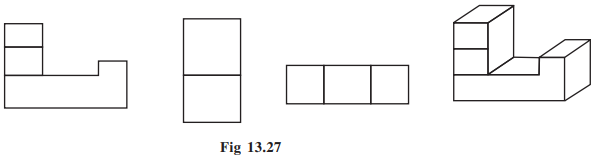
Try putting cubes together and then making such sketches from different sides